Add a special touch to your holiday mantel by hanging Christmas stockings that you've made yourself. Make a unique stocking for each member of the family and use them for many Christmas seasons to come.
Steps:
1.
Use an old or inexpensive purchased Christmas stocking to make your own stocking pattern. Lay the stocking on a piece of newspaper or kraft paper and trace around the stocking with a pen or pencil, a 1/2 inch from the stocking edges. This will give you a 1/2-inch seam allowance.
2.
Choose 1 yard of fabric for each Christmas stocking to be made and 1/4 yard of fabric for each cuff. Use a holiday print, quilted holiday fabric, or solid-color fabric or felt for your stocking. Make sure you have a coordinating thread color on hand.
3.
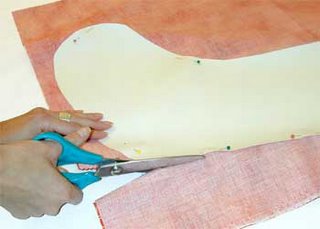
Lay the stocking fabric on a flat work surface and fold it in half, lengthwise, right sides together. Pin your paper pattern to the fabric and use dressmaker shears to cut through the paper pattern and fabric along your marked line. Make sure you cut through both layers of fabric. Set these two pieces aside. (Image 1)
4.
Place the stocking cuff fabric on your work surface. Use a fabric cutting board, a yardstick or ruler, and a fabric-marking pen to measure out two pieces of fabric that each measure 14 inches long. Use the top measurement of your stocking pattern for the width. (Image 2)
5.
Fold each cuff piece in half, wrong sides together, so that you now have two pieces that are 7 inches in length and the top width of your stocking pattern.
6.
Pin each folded cuff piece to the wrong side of a stocking piece so that all raw edges meet. Place pins at 1/2-inch intervals. (Image 3)
7.
Use a sewing machine to stitch the cuff pieces to the stocking pieces. Sew 1/2 inch from the raw edges. Press the seams open with an iron.
8.
Pin the two sewn stocking pieces together. Make sure that all edges match up evenly and that the right sides of the stocking pieces are facing each other. The pins should be perpendicular to the fabric edges.
9.
Insert a folded length of ribbon or cording between stocking layers at the upper left cuff seam (to use to hang the stocking). The toe of the stocking should be pointing to your right. The ribbon or cording should be angled upward and inserted far enough between the layers to be caught in the 1/2-inch seam allowance. (Image 4)
10.
Stitch along the edges of your stocking, 1/2 inch from the raw fabric edges. Remove the pins as you sew.
11.
Turn the stocking right-side out and fold the cuff down so that the seam line is hidden inside the stocking. (Image 5)
12.
Hang up your new stocking and hope for lots of goodies.
1.

2.

4.

Tips:
Make your pattern from a stocking that is 18 inches to 20 inches long. If you opt to make a smaller stocking, you'll need less fabric. If your desired stocking size is larger, make sure you purchase a larger quantity of stocking fabric.
Draw your own stocking pattern onto the newspaper or kraft paper. Practice drawing the shape a few times before cutting out your pattern, and remember to add the 1/2-inch seam allowance. Make your stocking 18 inches to 20 inches in length and 12 inches to 14 inches in width at its widest point.
Make an elegant Christmas stocking by using cotton velveteen for your stocking fabric and a quilted satin fabric for your cuff.
Add any trim or embroidery to the cuff and body of the stocking before you sew the stocking edges.
No comments:
Post a Comment